From Business to Personal, the Internet of Things is shaping the future

IoT connects devices like household appliances, applications, computers and other accessories by enabling the sharing of information. It has penetrated numerous industries by developing connected vehicles, smart houses, smart hospitals, and smarter factories. 

The Internet of Things (IoT) has been developed as a network of increasingly interconnected devices, ranging from Smartphones to sensor-equipped robots. This interconnection allows them to send and receive information that allows a wide variety of actions in daily and professional lives. Experts forecast that the number of IoT devices connected by 2020 is projected at 50 billion (COOK, 2020).

IoT and its Applications

Due to its dynamic capability for enhancing connectivity and data transfers, IoT is used in different methods:

  • Smart Homes
  • Efficient cities
  • Automobiles
  • Smart Grid Systems

Smart Homes

When we conceive of IoT systems, the home automation is the most significant and powerful system that stands apart, rating the top IoT application on all networks. The number of listings for intelligent homes is rising by about 60,000 per month. Also noteworthy is that 256 businesses and start-ups are included in the smart homes list for IoT analysis. More companies and related applications are now active in the field of smart homes (Domb, 2019).

Wearable Devices

The same as smart homes, wearables continue to be a hot topic for future IoTs. Consumers around the world expect the next Apple smartwatch to be launched next year. In addition, wearables like the Sony Smart B Trainer, LookSee bracelet or Myo control are also available to make lives easier (Harold, 2018). 

Smart Cities

Smart cities are a significant advancement, as the name implies, covering a wide range of applications, from transporting water, traffic control, waste management and environmental control. The reason it is so famous is that it seeks to mitigate the annoyance and difficulties of people living in cities. IoT technologies in the smart city field address a number of urban challenges, including traffic, air and noise pollution reduction and help make urban areas safer.

Automobiles

The semi-autonomous cars infused with IoT take on-site decision controls in part, preventing accidents and reducing the driver’s load. In addition to various sensors and cameras, vehicles are built into IoT systems to minimize human errors and make driving safer and more convenient. IoT has opened up new markets for car producers and purchasers around the world. IoT is a popular hotspot for numerous multipurpose applications, both for industrial and commercial applications in the automotive field. The Internet of Things technologies have made a significant impact on the global automotive industry from connected vehicles to automated transport systems (Intellia, 2019).

Smart Grid Systems

A smart grid is an energy network that allows a two-way electricity and data flow with digital communications technologies, allowing consumption changes and different problems to be observed, responded and supported. Intelligent grids have the potential to self-heal and encourage energy consumers to participate. A smart Grid is a grid that enables two-way energy flows and data, which typically considers smart metering as an early phase.

IoT shaping business trends

While IoT is practically present in every business field, it also helps to provide numerous advantages for business owners.

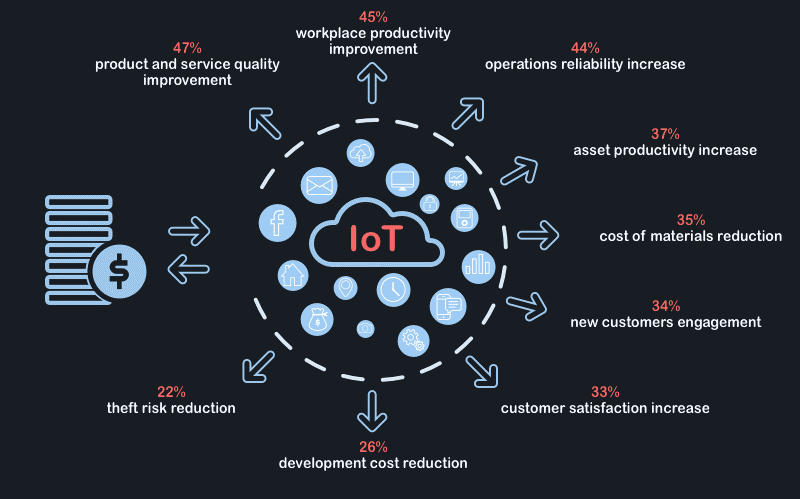
Enhancing business visions and customer experiences

Connected equipment throughout the field of production, transportation, the supply chain, farming and health care are generating more knowledge sources and analytics capacity, which will enable businesses to gain even more visibility into their market and the use of their goods or services by their consumers.

Reducing costs and downtime

A reduction in running costs and downtime is one of the advantages of these latest discoveries. This form of technology can minimize running costs as well as system inactivity in factories and elsewhere by helping employees understand how machines function and / or can be split up to operate – either through tablets or AR headsets This is the way to help people minimize their system costs (Domb, 2019).

Future Trends in IoT

IoT shaping business trends

The most important IoT development for 2020 is that IoT networks of smart devices that people communicate with will grow, and the volume of data that can be collected from such networks will also grow. We have consciously embraced a new lifestyle that is constantly linked. This cannot be overlooked and we are faced half way by the IoT industry. Data is the catalyst of the enhancement of IoT networks in the sensor-based technology-enhancing industries. The more data a company or corporation receives from users’ connected devices, the more probable they are to provide personalized experience to customers, meet their desires, and anticipate their behavior.

References

Cook

Domb

Harold

Intellia

5 Language Tips to Get Rid of Ambiguity in your Requirements

In this post, I’m going to show you how to create clearer requirements, avoiding common language habits that can introduce ambiguity.

Problem

Ambiguous and incomplete requirements can lead to project delays, rework and budget overruns.

We have ambiguous requirements when:

  • A single reader can interpret a requirement in more than one way and is unsure which the intended interpretation is
  • Several readers can interpret a requirement differently from one another

So often, requirements are ambiguous to their readers, despite the writer’s best efforts.

Incorporating the following simple language habits into requirements writing will help eliminate ambiguity and ensure consistency.

question_s

Tip 1: Use Active Voice

Passive voice is usually weaker writing since it makes it unclear who or what is doing the action.

Do not assume your reader knows who the actor is. Specifying an actor results in greater sentence clarity.

For example, use the active sentence

The system will generate the report.”

instead of the passive sentence

The report will be generated.”

active_voice_s

Tip 2: Avoid Dangling Participles

A participle phrase is a phrase that acts as an adjective. Sometimes, the noun that the participle phrase is intended to modify is not stated in the sentence. In this case, we talk about dangling participle, and it is something to avoid for the sake of clarity.

For example, consider the following sentence:

“After attempting to generate for more than two minutes, the customer will have the option to cancel the report.”

Here the missing word is the system because the system is attempting to generate the report.

This requirement is ambiguous because it sounds as though the customer is attempting to generate the report for two minutes when the writer’s intent is to focus on the length of time it takes the report to generate.

Correcting the dangling participle makes the requirement clearer:

“After attempting to generate for more than two minutes, the system will offer the customer the option to cancel the report.”

dangling_s

Tip 3: Use Specific Nouns

Use specific nouns to clarify who is performing an action.

For example:

The user will be able to export a report once a month.”

The noun user is too generic, maybe we are talking about a customer or vendor.

The following version of the same requirement is much better:

The vendor will be able to export a report once a month.”

nouns_shade

Tip 4: Clarify Pronouns

Repeatedly using specific nouns like “system” or “vendor” instead of pronouns may seem a little bit cumbersome, but will improve clarity.

For example, the following requirement is ambiguous because it is not clear which noun the pronoun it is referring to:

“The system will generate the report, and the UI will display the results. It must be redesigned to accommodate the report.”

What must be redesign, the system or the UI?

The next example is clearer because we simply repeat the noun again for the sake of clarity:

“The system will generate the report, and the UI will display the results. The UI must be redesigned to accommodate the report.”

pronouns_shade

Tip 5: Avoid Would and Should

Using the words would or should literally means that something is optional, but generally, that is not what the writer means when talking about requirements.

So, to avoid confusion, the best option is to use stronger words like “will” and “must”.

For example, consider using the following sentence

“The system will import all data.”

instead of

“The system should import all data.”

should2

Conclusion

Integrating these language habits in your requirements to decrease ambiguity, will give you several benefits, saving you time in your work. Team members will ask for fewer requirements clarifications and the project cycle will be faster!

References


How to Make Usage Analytics Work in SharePoint 2016

In this post I’m going to show you how to fix an issue in SharePoint 2016 that prevents usage reports from being correctly updated.

Scenario

We have a SharePoint 2016 site and we need to show users the usage reports.

Problem

The obvious solution would be to use the out of the box SharePoint 2016 Excel usage reports to do that… Unfortunately when we open them we always find all zeros, no matter how many users have interacted with the site and how many documents have been opened.

UsageReportAllZeros

Although we have correctly enabled Usage and Health Data Collection for the right events in Central Administration nothing happens.

Solution

After some research we found that in our fresh new installation of SharePoint 2016 the usage event receivers assemblies were wrong, version 15.0.0.0 instead of version 16.0.0.0.

A really tricky bug that fortunately in our case was successfully fixed by a few Powershell commands and some patience to wait data to be collected and reports to be updated.

Steps

1. Get Usage Analytics Event Receivers

Run the SharePoint 2016 Management Shell as Administrator and run the following Powershell commands to get the “AnalyticsCustomRequestUsageReceiver” and the “ViewRequestUsageReceiver” event receivers.

#Get AnalyticsCustomRequestUsageReceiver event receiver
$ad = Get-SPUsageDefinition | where {$_.Name -like "Analytics*"}
$vru = $ad.Receivers
$vru
#Get AnalyticsCustomRequestUsageReceiver event receiver
$pd = Get-SPUsageDefinition | where {$_.Name -like "Page Requests"}
$pru = $pd.Receivers
$pru

2. Check Usage Analytics Event Receivers Assembly Version

Once you get the event receivers, check for each one that the “ReceiverAssembly” property contains the correct assembly version.

For a SharePoint 2016 environment the correct assembly version must be 16.0.0.0 as shown in the picture below.

UsageEventReceiver

3. Delete the Wrong Event Receivers

If you are in a SharePoint 2016 environment and the event receivers assembly version is not 16.0.0.0 (for example it is 15.0.0.0) you must delete them executing the following Poweshell commands.

#If the receivers assembly is wrong, delete them using the script below
$vru.Delete()
$pru.Delete()

4. Recreate the correct Event Receivers

Now we need to recreate the correct event receivers (assembly version 16.0.0.0) executing the following commands.

#Create the correct event receivers
$ad.Receivers.Add("Microsoft.Office.Server.Search.Analytics.Internal.AnalyticsCustomRequestUsageReceiver")
$pd.Receivers.Add("Microsoft.Office.Server.Search.Analytics.Internal.ViewRequestUsageReceiver")

5. Run Usage Analysis and Import

Finally, we need to start the usage analysis and import as described below.

#Start usage analysis
$a = Get-SPTimerJob -Type Microsoft.Office.Server.Search.Analytics.AnalyticsJobDefinition
$sa = $a.GetAnalysis("Microsoft.Office.Server.Search.Analytics.SearchAnalyticsJob")
$sa.StartAnalysis()
#Get Analysis info. Make sure to wait for 15 minutes as this will allow to complete the timer job properly
$sa.GetAnalysisInfo()
#Start the usage log file import timer job
$tj = Get-SPTimerJob -Identity ("job-usage-log-file-import")
$tj.RunNow()

Conclusion

Having done all the previous steps, we now need only to let the timer job “Microsoft SharePoint Foundation Usage Data Processing” complete as per its schedule (this will not work if you run it manually).

After that, we should be able to view the usage report data correctly updated.

References

Rumi’s Point

Microsoft


How to Create a Timer Job with SharePoint Designer 2013

In this post I’m going to show you how to create a no server side code timer job using a SharePoint Designer 2013 site workflow.

Scenario

We have a SharePoint Online (Office 365) site with a task list in it and we need to send daily alerts to users that have overdue tasks assigned to them.

sp_task_list

Problem

The obvious solution would be to create a timer job to do that… Unfortunately we are in an Office 365 environment so we do not have the possibility to implement a standard timer job using server side code.

office_365_red

Solution

We can simulate the behaviour of a timer job using a Sharepoint Designer 2013 site workflow.

Steps

1. Create a New Site Workflow in Sharepoint Designer 2013

Open SharePoint Designer 2013 and create a new site workflow

site_wotkflow

2. Get All Overdue Tasks that are not Completed

In the first stage (let’s call it “Getting Overdue Tasks”) build a dictionary to store the accept header for our rest request and get results in json:

accept: application/json;odata=verbose

tj_build_dictionary

tj_accept_header

Put the current date in a DateTime variable (let’s call it “today”).

tj_today

Then call the SharePoint REST Service to get the overdue tasks.
To do so insert the “Call HTTP Web Service” action in the workflow (in an App Step to avoid permission related problems).

tj_call_service

The action url must be constructed dynamically  using the “today” variable like this:

tj_request_endpoint

tj_today_iso_formatted

Set the action verb to GET, the request headers to the headers dictionary previously built and the response content to a dictionary to store the request result.

tj_rest_call_properties

Get and store the returned tasks in a separate dictionary to count them and loop through them later.

tj_store_tasks

3. Send Alerts to Overdue Tasks Assignees

Create a second stage (let’s call it “Sending Alerts”) to send alerts and then link the first stage to it.

Insert a loop and inside it extract the task id from the rest response and send an email to each overdue task assignees.

Use a loop index variable to address the current task and remember to initialize it to zero and increment it properly at the end of the loop.

tj_loop

tj_mail

To get the email address of the recipient (the task assignee) use the task id previously extracted from the rest response like this:

tj_recipient

4. Wait One Day and Start Over Again

Insert a pause action and configure it to wait one day.

Link the “Sending Alerts” stage to the “Getting Overdue Tasks” stage to start over again.

tJ_pause

Conclusion

Here is how the complete workflow will look at the end of the process:

tj_complete_workflow

Publish the site workflow and start it (you can access the “Site Workflows” page from the “Site Contents” page).

tj_start_wf

It will send the alerts daily as expected.

tj_receive_mail

References

Fabian Williams

4 Steps to Get the Real Error Message from SharePoint 2013 Log Files

In this post I’m going to show you how to find the details of an error in the SharePoint log files.

Scenario

Sorry, something went wrong. An unexpected error has occurred.

Many of us have seen this non-informative message before, wondering what really happened.

FindError_Message

We need a way to get the real SharePoint exception to investigate the problem.

Solution

We can do that by using the SharePoint “Unified Logging System” (ULS).

SharePoint saves the details of errors and other diagnostic information in a log file on the server where the error happened.

Steps

1. Get Correlation ID

The first step is to note the Correlation ID.
You can directly copy it from the browser in the SharePoint error page.

FindError_CorrelationID

2. Get and Open ULS Viewer

You can open log files with Notepad or your text editor of choice.

However Microsoft has a tool called ULSViewer that can help you find your error more easily with the use of filters.

FindError_ULSViewer

3. Open Log File

Now you need to find and open the specific log file that contains your error.

To open a log file click on File -> Open From -> File.

FindError_OpenFile

By default SharePoint log files are stored in the SharePoint hive in the LOGS folder:

C:\Program Files\Common Files\microsoft shared\Web Server Extensions\15\LOGS

FindError_LogFolderHowever note that this path can be changed in SharePoint Central Administration.

SharePoint log files are named with the format “SERVERNAME-YYYYMMDD-HHMM.txt” where SERVERNAME is the server’s computer name, YYYYMMDD is the current date and HHMM is the time the log was started using a 24-hour clock.

In single server farms open the log from the day and time which the error happened.

In multi-server farms you’ll need to go to the specific server where the error happened to locate the log. If it’s not immediately obvious where the error happened you’ll need to check every server in the farm.

FindError_LoadedLogFile

4. Filter Log Entries

To find your error you will need to filter the log entries by Correlation ID and Level.

To do this click on Edit -> Modify Filter.

FindError_ModifyFilter

Then set the following values in the Filter By dialog.

Correlation ID filter:

Field: Correlation
Operation: Equals
Value: The Correlation ID you copied from the SharePoint Error message
And/Or: And

Level filter:

Field: Level
Operation: Equals
Value: Unexpected

FindError_Filters

Click OK and ULSViewer will show only the events that have the Correlation ID and Level specified.

FindError_FilteredLogEntries

Conclusion

Now we can finally see the real error!

If you double click on the log entry, a window will open to show all the error details so that you can begin your investigation.

FindError_ErrorDetails

References

Jason Warren

How to Estimate User Stories

In this post I’m going to show you the process and techniques to effectively estimate user stories.

Scenario

In our project we are using an iterative process in conjunction with user stories and we need, or are asked, to provide an estimate of how long the project will take.

EstimatingStories_QuestionMark

Ideal Estimation

The best approach for estimating user stories would be one that:

  • Allows us to change our mind whenever we have new information about a
    story
  • Works for both big and small stories
  • Doesn’t take a lot of time
  • Provides useful information about our progress and the work remaining
  • Is tolerant of imprecision in the estimates

Story Points

EstimatingStories_StoryPoints

An approach that satisfies each of these goals is to estimate in Story Points.

Story Points are relative estimates of the complexity, effort or duration of a story.

A nice feature of story points is that each team defines them as they see fit.
Story points can be entirely nebulous units or ideal time units like “ideal day” or”ideal week”.
Of course, as we’ll eventually need to convert estimates into time, starting with ideal time makes that conversion a little simpler than starting with an entirely nebulous unit.

What to Include

When programmers estimate a story, they should include everything they’ll need to do to complete it.

They need to factor in such things as testing their code, talking to the customer, perhaps helping the customer plan or automate acceptance tests, and so on.

Estimate as a Team

Story estimates need to be owned collectively by the team for two main reasons:

  1. Since the team doesn’t yet know who will work on a story, ownership of the story cannot be more precisely assigned than to the team collectively
  2. Estimates derived by the team, rather than a single individual, are probably more useful and accurate

EstimatingStories_Team

Process

To estimate user stories as a team:

  1. Implement a baseline story
  2. Compare with the baseline story and other user stories
  3. Split in tasks

From Story Points to Expected Duration

EstimatingStories_Calendar

Now we need a way to convert story points into a predicted duration for the project.
How to do that?

The answer is to use team velocity.

Velocity represents the amount of work that gets done by the team in an iteration

Once we know a team’s velocity, we can use it to turn ideal days into calendar days.
For example, if we estimate our project at 100 ideal days, then with a velocity of 25 we can estimate that it will take 100 / 25 = 4 iterations to complete the project.

It is often necessary to estimate a team’s initial velocity.
To do that you can:

  • Use historical values
  • Run an initial iteration and use the velocity of that iteration
  • Take a guess

References

Mike Cohn

4 Steps to Dynamically Display Locations on a Map in SharePoint 2013

In this post I’m going to show you how to display on a map the locations contained in a SharePoint 2013 list enabling the new Geolocation Field and Map View.

Note: The proposed solution works both for SharePoint 2013 On Premises and Online.

Scenario

We want to dynamically display the locations contained in a list on a Bing Maps map in a SharePoint 2013 site.

locationsOnMap

Steps

1. Create the list

Create the list that will contain the locations to show on the map.

In our example the list has simply Title and Description fields.
Later in this post we’ll learn how to add the location field.

locationList

2. Get a Bing Maps key

You can obtain a valid Bing Maps key from here.

bingMapsKey

3. Create the location field

To create the location field on our list we need to use a custom form in a page containing a script.

So first create a page where you wish to place the custom form.

formPage

On that page add a Script Editor web part that will contain both the script and html for our form.

scriptEditor

First add this javascript:


<script type="text/javascript">
var clientContext;
var relativeAdress;
 
 function AddGeolocationField() {
 ClearNotifications();
 GetRelativeAdress();
 clientContext = new SP.ClientContext(relativeAdress); 
 var web = clientContext.get_web();
 
 var targetList = web.get_lists().getByTitle(document.getElementById('listname_input_id').value);
 var fields = targetList.get_fields();
 fields.addFieldAsXml(
 "<Field Type='Geolocation' DisplayName='" + document.getElementById('fieldname_input_id').value + "'/>",
 true,
 SP.AddFieldOptions.addToDefaultContentType);
 
 clientContext.load(fields);
 clientContext.executeQueryAsync(function (sender, args) {
 document.getElementById('success_id').innerHTML = "You have succesfully created new geolocation field.";
 },
 function (sender, args) {
 document.getElementById('error_id').innerHTML = "Error: "+args.get_message();
 });
 }
 
 
 function SetBingKey() {
 ClearNotifications();
 GetRelativeAdress();
 clientContext = new SP.ClientContext(relativeAdress);
 
 var web = clientContext.get_web();
 var webProperties = web.get_allProperties();
 
 webProperties.set_item("BING_MAPS_KEY", document.getElementById('bing_key_id').value);
 web.update();
 clientContext.load(web);
 
 clientContext.executeQueryAsync(function (sender, args) {
 document.getElementById('success_id').innerHTML = "You have succesfully entered BING map key on "+web.get_title()+" site";
 }, function (sender, args) {
 document.getElementById('error_id').innerHTML = "Error: "+args.get_message();
 });
 }
 
 function GetBingKey() {
 
 ClearNotifications();
 GetRelativeAdress();
 
 clientContext = new SP.ClientContext(relativeAdress);
 var web = clientContext.get_web();
 
 var webProperties = web.get_allProperties();
 
 clientContext.load(webProperties);
 
 clientContext.executeQueryAsync(function (sender, args) {
 document.getElementById('bing_key_id').value = (webProperties.get_fieldValues()["BING_MAPS_KEY"]);
 
 }, function (sender, args) {
 document.getElementById('bing_key_id').value = "";
 document.getElementById('error_id').innerHTML = "Property not found! Please check your web site relative URL.";
 });
 }
 
 function ClearNotifications(){
 document.getElementById('success_id').innerHTML = "";
 document.getElementById('error_id').innerHTML = "";
 }
 
 function GetRelativeAdress(){
 if (document.getElementById('webrelative_url_id').value === "")
 relativeAdress = "/";
 else
 relativeAdress = document.getElementById('webrelative_url_id').value;
 if(relativeAdress.charAt(0)!='/')
 document.getElementById('error_id').innerHTML = "Relative adress has to start with /";
 }
 
 </script>

Then add this html:

<table style="width: 480px;">
<tbody>
<tr>
<td style="width: 200px;">Web relative URL:</td>
<td style="width: 5px;">&nbsp</td>
<td valign="top"><input id="webrelative_url_id" name="relative" type="text" value="/">
<label style="font-size: 8pt;">
* Input web relative URL and select "Get BING key" to check if key is set</label></td>
<td style="text-align: right;" valign="top"><input onclick="GetBingKey()" type="button" value="Get BING key"></td>
</tr>
<tr>
<td style="width: 200px;" valign="top">Bing Maps Key:</td>
<td style="width: 5px;">&nbsp</td>
<td valign="top"><input id="bing_key_id" name="bingkey" type="text">
<label style="font-size: 8pt;">
* Input Bing map key and relative url to web site to wich you wish to add the key</label></td>
<td style="text-align: right;" valign="top"><input onclick="SetBingKey()" type="button" value="Set BING key"></td>
</tr>
<tr>
<td style="width: 200px;" valign="top">List name:</td>
<td style="width: 5px;">&nbsp</td>
<td valign="top"><input id="listname_input_id" name="listname" type="text">
<label style="font-size: 8pt;">
* Name of the list where you wish to add your new geolocation field</label></td>
<td></td>
</tr>
<tr>
<td valign="top">Field name:</td>
<td style="width: 5px;">&nbsp</td>
<td valign="top"><input id="fieldname_input_id" name="fieldname" type="text">
<label style="font-size: 8pt;">
* Name of the new geolocation field you wish to add</label></td>
<td style="text-align: right;" valign="top"><input onclick="AddGeolocationField()" type="button" value="Create field"></td>
</tr>
</tbody>
</table>
<label id="error_id" style="color: red;">
</label>
<label id="success_id" style="color: green;">
</label>

And now you have your form for adding geolocation fields anywhere on your site collection.

geolocationForm

Once you have entered the relative path to your web you can use the Set BING key button to add the BING maps key to the web.
You can optionally use the Get Bing key button to check if you have already a BING maps key placed in that web.

bingMapsKeyEntered.png

Once entered List name and Field name you can use the Create field button to add a geolocation field with the name you specified to the list on the web.

locationFieldEntered

geolocationField

Note: For SharePoint 2013 On Premises an MSI package named SQLSysClrTypes.msi must be installed on every SharePoint front-end web server to view the geolocation field value or data in a list.  This file is installed by default for SharePoint Online.

More information on this can be found here.

4. Create the Map view

You now have the possibility to create a Map view for your list to show locations.

mapView

mapViewFields

Conclusion

You can now add items to your list and see their locations appear on the Map view.

insertLocation

locationsOnMap

References

MSDN
Borislav Grgić

How to Export a SharePoint 2013 List with Lookup Columns

In this post I’m going to show you a workaround to an issue that causes data loss when exporting lists with lookup columns to another site.

Scenario

We have 2 lists in a SharePoint 2013 site, one with a lookup column to the other, and we need to export them to another site without loosing any data.

Export List with Lookup - List A

Export List with Lookup - List B

Problem

In the List Settings page of our lists we can use the “Save as Template” functionality to export them.

Export List with Lookup - Save as Template

The list templates are successfully created so we can load them to the destination site collection and recreate the lists from them in the new site.

Note: the destination site language must be the same as the source one

Export List with Lookup - List Templates

However looking closer to List B we note that all the data in the lookup column has been lost…

Export List with Lookup - List B with Lost Data

This happens because the lookup column points to List A GUID, not its path or name…

The GUID of List A in the destination site is different from that of the same list in the source site, so the lookup column is now pointing to a list that does not exist in the new environment.

Unfortunately we can’t change the lookup column definition in the destination site and get our data back because the “Get information from: ” section is locked…

Export List with Lookup - Lookup Column Locked

So, how to solve this problem?

Solution

We can change the list template manifest file and set the correct list GUID or path for the lookup column.

Let’s see how to do that in detail…

Steps

1. Change the list template file extension

Download the template file of our list with the lookup column (in our example the file is ListBTemplate.stp) and change its file extension from “stp” to “cab”.

Export List with Lookup - List B CAB Extension

2. Extract the files contained in the list template cab package

You can use WinRAR or WinZip to extract the files contained in the cab file

Export List with Lookup - List B Extracted Files

3. Change the list template manifest file

Open the manifest.xml file contained in the list template extracted files (in our example it is the only file) and replace the lookup column list GUID (in our example the GUID of list A in site A, f8088b28-1434-4b51-96d3-a36e945e5146) with the new list GUID or relative path (in our example the GUID or relative path of list A in site B, 265bffc8-dcc9-48e3-99e4-d3ad1d5e2260 or Lists\List A).

Export List with Lookup - Manifest

4. Recreate the list template package

Now that we have changed the content of our manifest file we need to recreate the cab package. To do that we ca use the makecab command in the command prompt using the following syntax:

makecab "<source file>" "<destination file>"

In our example the specific command is as follows:

makecab "C:\List Templates\ListBTemplate\manifest.xml" "C:\List Templates\ListBTemplate\ListBTemplate.cab"

Export List with Lookup - makecab

Export List with Lookup - makecab result

Once created the cab file we can change its file extension to “stp”, reload it to the destination site collection and recreate our List B.

Conclusion

This is how our new list with the lookup column should look like:

Export List with Lookup - List B without Lost Data

You can see that our lookup data is there again without any loss.

References

dotNETgeekster

The 4 Reasons Why User Stories are Better than Requirements Specifications

In this post I’m going to show you why User Stories are a better solution than Requirements Specifications to effectively understand user needs and build successful products.

Introduction

Software requirements is a communication problem.

How do you decide what a software system is supposed to do?
How do you communicate that decision between the various people affected?

communication_problem

Experience has taught us that Requirements Specifications do not work anymore in today’s  world and that User Stories are a much better solution.

I’m going to explain you why in this post…

What are Requirements Specifications?

A typical Requirements Specifications fragment is the following:

IEEEFormat

There is a tremendous appeal to the idea that we can think about a system and then write all the requirements upfront.

Requirements Specifications written like that have sent many projects astray because they focus attention on a checklist of requirements rather than user goals.

What Is a User Story?

A user story describes functionality that will be valuable to either a user (who uses the system) or customer (who pays for the system).

user_story

The format of a User Story is the following

As a <Role> I want <Function> so that <Benefit>

as in the example below

As an executive, I want to generate a report so that I can understand which departments need to improve their productivity

Our goal with user stories is to write down a short place holding sentence that will remind developers and customers to hold future conversations.

Why User Stories are better?

1. Comprehension

A way that extensive upfront Requirements Specifications can kill a project is through the inaccuracies of written language.

The shift toward verbal communication of User Stories provides rapid feedback cycles, which leads to greater understanding.

2. Planning

A difference between User Stories and Requirements Specifications is that with the latter the cost of each requirement is not made visible until all the requirements are written down.

With stories, an estimate is associated with each one right up front so that they may be conveniently used for release planning.

3. Resiliency

Change always happens in projects…

  • Users and customers do not generally know exactly what they want
  • Many of the details needed to develop the software become clear only as the system is being developed
  • Product and project changes occur
  • People make mistakes

User Stories embrace change because

  • Do not need to be all written before developers can begin coding the first
  • Encourage deferring details because we can write them at whatever level of detail is appropriate in a given moment.

4. Prioritization

It’s hard to prioritize and work with thousands of sentences all starting with “The system shall…”.
That difficulty usually results in having the user considering 95% of the requirements high priority!

On the opposite, User Stories can be easily ordered by priority.

References

Mike Cohn

How to Create a List Item Inside a Folder Using a SharePoint Designer 2013 Workflow

In this post I’m going to show you how to create a list item inside a folder in a SharePoint Designer 2013 workflow even though the “Create List Item” built-in action and even the new rest api do not allow us to do that.

Scenario

We have a folder inside a custom list and we need to automatically create items inside it using a SharePoint Designer 2013 workflow.

Item in Folder- Folder

Problem

In a SharePoint 2010 workflow we used to simply set the “Folder” property in the built-in action “Create List Item”… and it worked! Our item was correctly created inside the specified folder.  Unfortunately in a SharePoint 2013 workflow setting the “Folder” property has no effect. Even the new SharePoint 2013 rest api does not come to our rescue.

Solution

We can use the old listdata.svc service to achieve our goal making a rest call to it inside our SharePoint Designer 2013 workflow.

Steps

1. Create the headers dictionary

We must build a dictionary to store some headers, specifically the following ones:

Accept: application/json;odata=verbose
Content-Type: application/json;odata=verbose

Item in Folder- Headers.png

2. Create the data dictionary

Next, we need a dictionary that will contain our request data.

The dictionary must have an entry for each item mandatory fields and an entry to set the item path.

Title: Item 1
Path: <list url>/Folder 1

Item in Folder- Data

The item path must be constructed dynamically to point to the folder we want to place our item in.

Item in Folder- Path

3. Call the SharePoint REST service

Finally, we are ready to call the SharePoint REST service to create our item inside the list folder.

To do this we need to insert the “Call HTTP Web Service” action in our workflow.
The action url must be constructed dynamically like this:

https://site/_vti_bin/listdata.svc/SimpleList

Item in Folder- Endpoint.png

The http method must be set to POST.

Item in Folder- Method

The request headers must be set to the headers dictionary.
The request content must be set to the data dictionary.

create_list_folder10

Conclusion

This is how the complete workflow should look like:

Item in Folder - Workflow

Now we can publish and run it and see that a new item is correctly created inside our folder.

Item in Folder- Folder Workflow Completed

Item in Folder- Item Workflow Completed

References

MSDN